In The Beginning
Whoever that brave soul was who first decided to climb on a horse’s back probably impressed all of his friends and neighbors by how much further he could go and how quickly he could get there. But very soon he found that for long distances that it wasn’t very comfortable for either him or the horse. In bareback riding, which is a great tool for developing balance, all of the rider’s weight is concentrated in a very small area of the horse’s back. The main job of a saddle is to spread the rider’s weight out over the length of the rib cage which lowers the pounds per square inch to an acceptable level for the horse. The other thing a saddle must do is to keep any pressure off of the horse’s spine.
The first western saddles were inspired by the Spanish and Mexican Vaqueros or Charros. In the 1400’s the Spanish had brought two basic saddle styles with them, La Estradiota, and La Jineta. The first Western saddles had no horn, instead, a rope would be tied to a D-ring. Somewhere along the line some ingenious Vaquero invented a large wooden saddle horn that was made part of the saddle tree. By the beginning of the nineteenth century, the Vaquero stock saddle had evolved to the point that it was the standard in the western part of the United States. One of the distinguishing features of a western saddle is double rigging which first started to appear on saddles in the Texas area. The rear cinch was designed to keep the back of the saddle from lifting when roping.
While I will be referring to the Western tree, the basic concepts apply to the English saddle as well but instead of using the bars of the Western tree to spread out the rider’s weight the English saddle uses panels stuffed with wool or foam. Four things to keep in mind are that the heavier the rider, the more often they ride, the longer they ride and the harder they ride, the more critical it is to have a saddle that fits. A one hundred and ten pound gal who rides an hour once a week and only walks her horse can get away with a terrible fitting saddle and possibly never see a problem. A two hundred pound guy who rides twenty hours a week and does a lot of cantering and trotting does not have much room for error when it comes to a good fit.
Rock and Twist
Two dimensions on the horse’s back must be addressed for proper saddle fit. First, the front to back curvature of the saddle tree, referred to as ‘rock’ or ‘rocker’, must match that of the horse’s rib cage. If you picture the bottom rails on a rocking chair you can see that too much rock will put excessive pressure into a small area of the horse’s back,

and too little rock will create pressure at the front and rear of the saddle with very little in between.

This would be called ‘bridging’. A saddle will also bridge if the gullet is too narrow and won’t allow the saddle to sit down properly in front. Secondly, the change in angle of the bars from the front of the tree to the back, referred to as the’ twist’, must also match the horse’s rib cage. If you look at the bottom of a tree you will see that the angle of the bars are steeper in the front and gradually flatten out towards the back. Too much or too little twist can cause problems wherever it doesn’t match the horse’s rib cage.

When considering saddle fit you would like to see maximum contact in the middle two thirds of the saddle with contact tapering off at the front and rear of the bars.
If the front of the bars don’t have enough ‘flare’ in them, there won’t be enough room for the shoulder to operate comfortably or for the horse to move his neck laterally. Gaited horses, with their more animated shoulder motion, need even more flare than other breeds. In the rear of the bars there must be enough flare for the horse’s hips to alternately rise and fall.
Saddle Trees
Through the years the bars of the saddle tree have been loosely classified by various names. Some of the more popular are semi-Quarter Horse, Quarter Horse, and Arab-Morgan trees. If we divide up different horse’s rib cages into narrow, medium and wide classifications, Semi-Quarter Horse barred trees would be a starting point for your narrower horses, Quarter Horse barred trees would be for the medium range and Full-Quarter horse and Arab-Morgan barred trees for your wider horses.
That being said, there is absolutely no standard between tree manufacturers. If we took three Quarter Horse barred trees from three different tree manufacturers there would be differences not only in gullet height and width but also in the rock and twist. That’s why one saddle maker’s full Quarter Horse barred tree might work fine and then you switch to another brand and you end up with a sore horse.
Being a custom saddler, one of the things we hear all the time is “I have a hard to fit horse.” Generally, these people have tried three to five different saddles from different manufacturers and haven’t had any luck with any of them. Production line or tack shop type saddles are built on averages. “The “average” narrow horse’s back needs a gullet that is so wide and so high and needs this much rock and this much twist.”

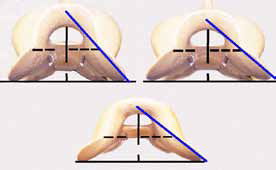
Look at the EQUImeasures on the left showing the front view. These two horses are almost identical in the front. Look at these same EQUImeasures on the right showing the view from the rear. The horse on top has quite a bit more rock to his back. If we took a saddle that fit the bottom flatter horse and put it on the horse that looked like the top mold, it would obviously bridge even though they both would take a semi-Quarter Horse tree.
Also, what happens when a horse has what I call a combination back? Maybe he is narrow in the front but the twist flattens out more than the “average” narrow horse. Horses are just like people. If we take ten men who are 6’ tall and weigh 180 lbs, five of them would look fine in an off the rack suit. The other five would have varying levels of success because they aren’t “average” enough. A couple of them might have to have a tailored suit custom made for them.
Measuring Your Horse
Different measuring techniques have been used over the years. If you can’t take your horse to the tack shop to try different saddles or you are having a custom saddle made the absolute minimum you should do is get a wither tracing. You can take something flexible like wire or buy a drafting tool called a Flexible Curve and mold it over the horse’s back about two inches behind the shoulder blade and then trace it on a piece of stiff paper or cardboard. You can then try your template in the gullets of different saddles or send it to the saddle maker and you will be able at least get a saddle with the right width tree in it. If your horse falls into the realm of average for that width tree you shouldn’t have any problems.

One of the most creative ideas that has come along is the EQUImeasure Kit. It is a flat sheet of thermal plastic that you slide into the oven and heat up until pliable and then mold to your horse’s back. You can bring it to the local tack shop and try the mold in different saddles to see which is the closest, or, you can send the EQUImeasure to any custom saddler and it’s like having the actual horse’s rib cage right there in the shop.
When evaluating saddle fit I have come to believe that it can be difficult for most people to visually inspect the fit themselves. One of the other uses for the EQUImeasure form is for evaluating fit. If you place your saddle on the ground on its pommel and set your EQUImeasure into the bottom of the saddle, you can look to see how much contact you are getting.
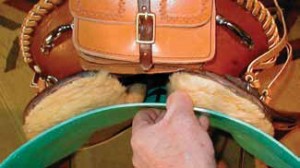
This is far easier for most people than trying to do this with the saddle on the horse. Once again, you are looking for good contact the middle two-thirds of the saddle with contact tapering off slightly at the front and back. If the shape of the bottom of the saddle doesn’t match the shape of the form, you’re headed for trouble.
Accessing Saddle Fit
When people talk about how well a saddle fits usually the first thing I usually hear is “Check the sweat pattern”. The theory says that if you go for a ride and get your horse good and sweated up, when you remove the saddle, you should see a nice even sweat pattern under the saddle that reassembles the bars of the tree.

Any dry areas would indicate that the pressure was so great that it shut down the sweat glands and that the smaller the dry area the higher the pressure.
The problem is that with all the advancements in technology your better pads are designed to wick away moisture or to allow air to circulate under the saddle to keep the horse cooler, so you might get dry spots only because the pad is doing what it is designed to do not because of excessive pressure. Also an area on a horse’s back that has been damaged from an ill fitting saddle may never sweat in that spot again.
Dry spots to me are only a call to attention. I’ll keep an eye on the area. After every ride, as soon as I remove my saddle, I’ll take a look at the sweat pattern and if I see dry areas I’ll run my hand lightly over that area to see if there is any tenderness. If Happy Jack, my horse, doesn’t show obviuos tenderness to the touch and try to duck away, I’m not going to lose any sleep over it. If the area is tender or shows swelling then I know there is a problem.
A few years ago, about halfway through the summer, even though I was getting perfect sweat patterns after our rides, Happy Jack, who is a Chestnut Arab, started to show two or three white hairs on each side of his back right behind the shoulder blades.

White hairs on your colored horses are caused by the cells of the hair follicle dying out because of too much pressure. In this case I was getting a perfect sweat pattern but there was still too much pressure there. If something is done right away, most of the time the discoloration will go away, but if you wait too long it may remain for the life of the animal. Moral of the story: Sweat patterns can indicate an area to keep an eye on but can be misleading taken on their own.
If visually your saddle looks good, the next best indicator of proper fit is your horse. How is his attitude? If your horse is in pain, nine times out of ten, he’ll let you know. Is he tender to touch? Is there any swelling? Is hair being rubbed off? Is there any discoloration? The signs are often there, if you’re looking!
Saddle Rigging
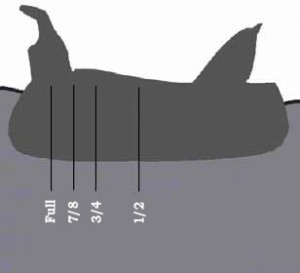 A couple of thoughts on the way saddles are rigged. If you took half the distance from the cantle to the pommel or swell, and the rigging was hung from that point, it would be called ‘center-fire rigging’ or half rigging. Three quarter rigging would be three quarters of the distance from the cantle to the pommel. Seven eighths rigging would be seven eighths of the distance and full rigging would be with the rigging hung straight down from the pommel.
The majority of saddles are built with three quarter or seven eighths rigging. On saddles that are rigged seven eighths or full, I recommend snugging up the flank cinch so you don’t have to tighten the front cinch so much.
I have seen saddles that fit the horse perfectly but the horse was getting the tell tale white spots behind the shoulder just because full and sometimes seven eighths rigging pulls down so hard in the front of the saddle that it lifts the back up off the horse and then when the rider sits in the saddle, his weight pushes the saddle back down in back. At this point, the saddle becomes a crowbar and puts even more pressure in the front.
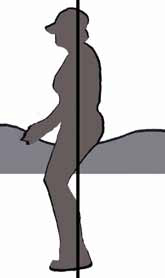
Rider Balance
The last thing I would like to address is the rider’s responsibility to the horse. A saddle can also fit a horse perfectly and still sore a horse just because the rider is so out of balance. There are two parts to the riders bal¬ance, longitudinal (front to back) and lateral (side to side). For a saddle to do its job correctly the rider needs to be as close to the center of the saddle front to back as well as side to side. We’ll cover longitudinal balance first.
 Have you ever seen a rider who sticks his feet out in front of himself and pushes his weight to the back of the seat. It’s as if he were sitting in a recliner. Instead of the saddle dispersing the rider’s weight half to the front and half to the rear; it loads more weight in back with little in front.
Some people are so out of balance this way that they can put twice as much weight in back as they do in front. No matter how good a saddle fits, the horse is going to get sore right under the rear ends of the bars on each side.
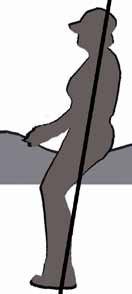
 Many Endurance and Competitive Trail riders, who are doing long distance events, will ‘two point’ (stand in their stirrups) or post to relieve fatigue. If their stirrups are forward hung instead of in a centered, or balanced, or Dressage position or whatever you want to call it, they put too much pressure in the front of the saddle which results in a sore horse right behind the shoulder blades. You want to be balanced over your stirrups with your legs underneath you, not out in front of you. Ide¬ally your ankle, hip, shoulder and ear should be in vertical alignment. You should be able to stand up without having to throw yourself forwards to get over the stirrups.
The only reason to shift your weight forward is because of speed. As you increase speed, your weight should move forward accordingly. Without getting into a physics lesson here the best illustration is to pic¬ture balancing a broomstick on your finger. If you want to walk forwards, the broomstick has to lean out ahead of you or it will fall backwards. The faster you go, the more the broomstick needs to lean forwards. This is described as moving with the action of the horse. If you don’t adjust your weight forwards as the horse picks up speed, you end up behind the action which makes it harder for your horse to work underneath you.
 When you are out of balance laterally, you end up with more weight on one side of the horse’s back than the other.When we see a horse with a problem on one side of the back and not the other, the first thing we check is to see that the length of the stirrups is the same. Just because you have each of the leathers in the same hole on each side doesn’t mean that they are level. Leather stretch¬es. Synthetic materials stretch. They have to be even or the shorter one will pull the saddle to that side putting pressure on the opposite side of the back as the stirrups seek to be level.
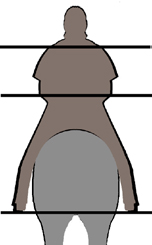 Another problem is that because we are ‘right handed’ or we kick a ball with or left leg or we pitch hay this way or that way our bodies become out of balance. We end up with stronger muscles on one side than the other. Many people who are severely out of balance will collapse one side of their body which tilts the pelvic girdle the opposite way resulting in more weight on one side of the horse’s back than the other. Ideally you want to be centered in the middle of the saddle side to side. Just because we put a saddle on our horse, it doesn’t relieve us of the responsibility of staying in the center of the saddle with good posture.
In Conclusion
Before buying a saddle from a tack shop or a custom saddler there are a few questions I would like to have answered.
First, how are they going to fit your horse? If all they need to know is what breed horse you have, that would be the end of the conversation for me. The minimum would be a wither tracing.
Next, can any adjustments be made if something is a little off? If you’ve already had problems with other generic fit saddles, this could be an issue.
What is the fit guarantee and return policy? Make sure within the trial period that you can go on two or three rides where you are in the saddle for at least a couple of hours. If you don’t have the time, then wait until you do. The worse possible scenario would be finding out a few weeks after the trial period is over that you have a sore horse and you’re stuck with a saddle that doesn’t fit.